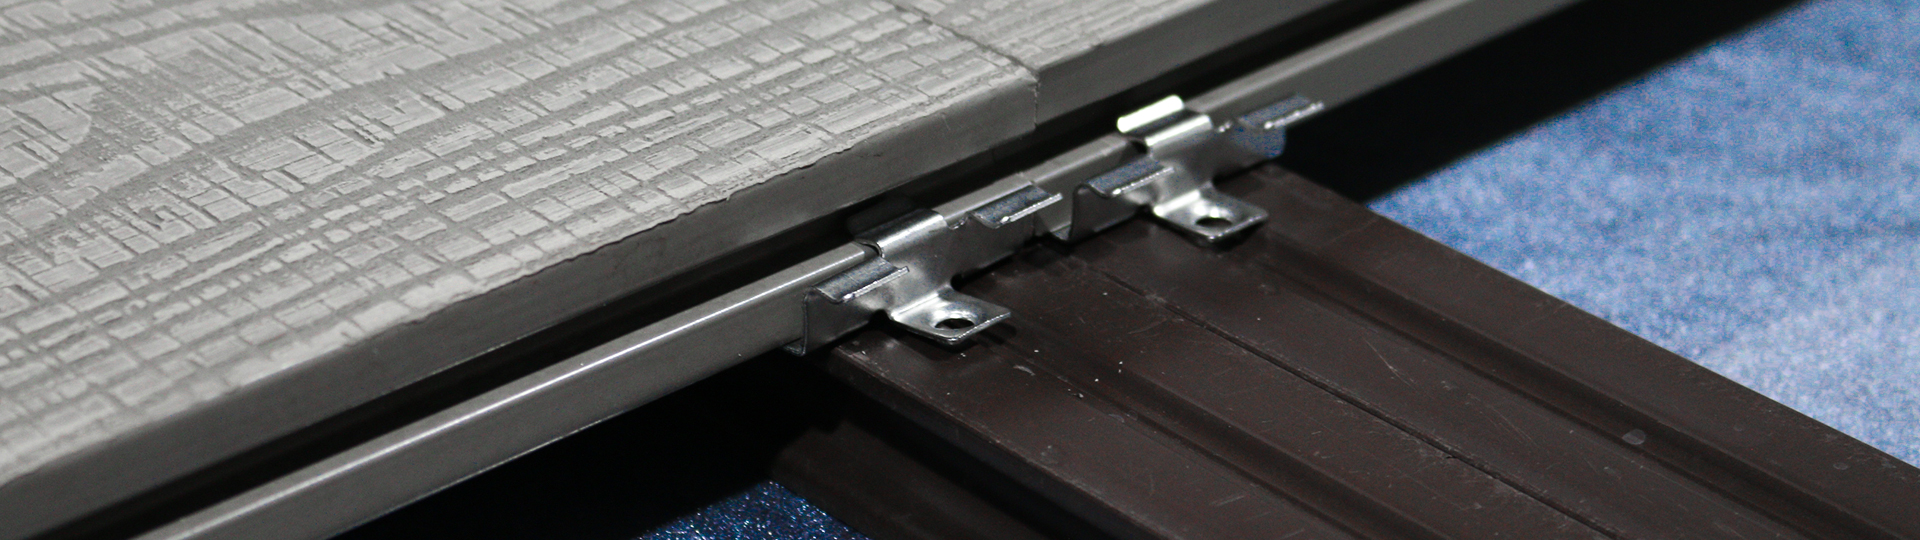
Stainless steel hidden decking clips fixing WPC boards to an aluminium keel
Technical Support

WPC Composite Decking Installation Instructions

A correctly built sub-structure is what separates a deck that lasts 25 years from one that warps in two. Follow these three steps and five critical notes — the same guidance our technical team gives to installers in 65+ countries.

Before you start

Tools, Materials & Site Conditions

WPC decking is installed as a floating system on a timber or aluminium keel. The boards are never fixed directly to the ground — everything depends on a level, drained, ventilated sub-frame.

Tools you need

  • Rubber hammer (never a steel hammer)
  • Twist drill for pilot holes
  • Drill driver / screwdriver
  • Circular saw with fine-tooth blade
  • Spirit level, tape measure, string line

Materials

  • WPC decking boards
  • WPC or aluminium keel / joists
  • Expansion screws (with plastic plugs)
  • Hidden plastic clips + stainless screws
  • Verge board / end trim (optional)

Site conditions

  • Ground must be hardened and level
  • Minimum 30 mm ventilation under keel
  • Drainage installed after keel fixing
  • Do not install on soft soil or grass
  • Acclimatise boards 24 h on site

5 Critical Installation Notes

  1. Leave a 3–5 mm expansion gap between the keel and the main building. WPC expands slightly when heated and when it absorbs moisture — without this gap the deck can buckle against the wall.
  2. Pre-drill before screwing. WPC is hard and brittle; expansion screws must be bolted 70 mm from the board end, and a pilot hole must be drilled with a twist drill first.
  3. Space expansion screws 400–500 mm apart along each keel to keep the sub-frame rigid and flat.
  4. Use the plastic clip on the first board — the clip must sit flush with the keel, not proud of it.
  5. Install drainage only after the keel is fixed. Water must never be allowed to sit under the boards, or the decking will be damaged.
Step by step

Three Steps to a Finished Deck

Each step below shows what to do, why it matters and the exact dimensions to work to. The diagrams are drawn to the same specifications our installers use on site.

01

Prepare the Foundation & Fix the Keel

Harden the ground, set out the keel grid, then anchor it with expansion screws.

To install the flooring, the fundamental ground floor must be hardened first. Then fix the keel to the hardened ground with expansion screws.

Keep the spacing between two keels at L ≤ 350 mm — this can be adjusted slightly according to site conditions, but never widened beyond 350 mm for standard residential use.

  • Check the ground for level before laying any keel
  • Keep 3–5 mm clearance where the keel meets the building
  • Drive expansion screws at 400–500 mm centres
  • Pre-drill 70 mm from the board end to avoid splitting
wall keel / joist (timber or aluminium) expansion screws L ≤ 350 mm 400–500 mm screw spacing along keel 3–5 mm gap to building
Plan view: keel spacing L ≤ 350 mm, screws at 400–500 mm centres, 3–5 mm gap to the wall.
02

Lay the First Board & Fix with Plastic Clips

The hidden clip system is what gives WPC decking its clean, screw-free surface.

Insert the first board into the side plastic clip, making sure the clip sits flush with the keel. Then insert a plastic clip into the groove of the installed board.

Use a rubber hammer to tap the board so the gaps stay balanced and even along the whole run — then fix the clip and continue installing all remaining boards.

  • Always tap with a rubber hammer, never a steel one
  • Work from one edge to the opposite side
  • Check every few boards that gaps remain even
  • Fix the clip only after the gap is correct
hardened, level ground keel 3–5 mm WPC decking board next board rubber hammer hidden plastic clip
Cross section: board grooves engage the hidden clip, which is screwed down flush to the keel.
03

Finish the Last Board Edge

Where the clip system runs out, fix through the groove at 45° or cover with a verge board.

When the last piece edge cannot be fixed with a plastic clip between the keel and the floor connection, use a self-tapping screw through the groove between the keel and the board.

Pre-drill the hole at a 45° angle, then fix with a visible screw. Alternatively, finish the edge with a verge board, also fixed with visible screws.

  • Pre-drill at 45° to avoid splitting the board
  • Use stainless steel or coated screws only
  • Countersink visible screws slightly below the surface
  • Verge boards hide the cut edge and give a clean line
hardened, level ground keel last board 45° pre-drilled pilot hole verge board (optional) self-tapping screw (45°)
Edge detail: 45° pre-drilled screw through the groove, or a verge board fixed with visible screws.
Specifications

Installation Dimensions at a Glance

Every dimension on this page in one table — print it and take it to site.

Recommended values for standard residential WPC decking. Commercial and high-traffic decks may require tighter spacing — contact our technical team.
Parameter Recommended value Why it matters
Keel (joist) spacing L ≤ 350 mm Prevents board deflection underfoot and long-term sagging
Expansion screw spacing 400–500 mm Keeps the sub-frame rigid and level along its length
Screw distance from board end 70 mm WPC is brittle — too close to the end causes splitting
Gap to building / wall 3–5 mm Allows thermal and moisture expansion without buckling
Ventilation under keel ≥ 30 mm Airflow keeps the underside dry and prevents mildew
Edge fixing angle 45° pre-drilled Secures the last board without splitting the groove
Done right

What a Correctly Installed Deck Looks Like

Even gaps, flat boards, no visible fixings and a clean edge — the result of following the three steps above.

FAQ

What is the correct keel spacing for WPC decking?
The recommended spacing between two keels is L ≤ 350 mm. It can be adjusted slightly according to the load and site conditions, but should never exceed 350 mm for standard residential decking.
Why must a 3–5 mm gap be left between the deck and the building?
WPC products expand slightly when heated and when they absorb moisture. Leaving a 3–5 mm gap between the keel and the main building prevents buckling and deformation as the material moves.
Why do WPC boards need pre-drilled holes for screws?
WPC is hard and brittle. Expansion screws must be bolted 70 mm from the board end, and a pilot hole must be drilled with a twist drill before driving the screw — otherwise the board may crack or split.
Can I install WPC decking directly on grass or soil?
No. The ground must be hardened and level, and drainage must be installed after the keel is fixed. Installing on soft or poorly drained ground causes movement, warping and water damage.
Can I cut WPC decking boards on site?
Yes. Use a circular saw with a fine-tooth blade and cut slowly to avoid chipping the surface. Always cut from the decorative face side and wear eye protection, as WPC produces fine dust.
Large WPC decking platform with matching composite railing in a public park

Not Sure About Your Sub-Structure?

Send us your deck plan or a photo of the site — our technical team will confirm keel layout, clip quantities and expansion gaps before you order. Free support from shipment to installation, 7×24h online.

Quick Links

Products

Contact Us

  Industrial Concentration Zone, Yangshou Town, Yangzhou City,Jiangsu Province, China
  +86-18752749508
Inquiry
Copyright © 2023 Jiangsu Senyu New Material Co., Ltd . All Rights Reserved. Supported by leadong.com  |  Sitemap