Views: 0 Author: Site Editor Publish Time: 2025-12-05 Origin: Site
Over 73% of new home decks use composite materials.
64% of people see lower costs for upkeep.
If you use the best ways to install composite decking, you can skip common mistakes and make a great deck. This guide helps you finish your decking project with confidence.
Getting ready is very important. Collect all the tools and materials you need before you start. This helps you save time and stops mistakes from happening.
Planning your deck is very important. Measure everything carefully. Check the building codes in your area. This makes sure your deck is safe and follows the rules.
Build a strong frame for your deck. Make sure the frame is flat and secure. This helps your composite boards stay in place. It also makes your deck last longer.
Leave space between the boards. This lets the boards expand when it gets hot or cold. It stops the boards from bending or breaking.
Take care of your deck often. Clean your deck regularly. Fix any problems as soon as you see them. This helps your deck last a long time.
Getting ready for your decking project starts with proper preparation. You want to make sure you have all the right tools and materials before you begin. This step saves you time and helps you avoid mistakes later. Let’s look at what you need.
You don’t need fancy equipment to install 12ft composite decking boards. Most tools are easy to find at your local hardware store. Here’s a handy list you can check off as you gather supplies:
Tape measure
Chalk line
Circular saw
Drill/driver
Hammer
Sledgehammer
Jigsaw
Framing square
Putty knife
End nippers
2×4 for tapping block
Composite decking screws
Hidden fasteners
Tip: Double-check your tools before you start. Missing just one can slow down your project.
You need more than just boards to build a strong deck. You’ll want to pick materials that last and fit your budget. Composite decking boards cost a bit more than wood, but they last longer and need less care. Here’s a quick look at how prices compare:
Decking Material | Cost per Square Foot |
|---|---|
Pressure-treated wood | $3 to $6 |
Cedar or redwood | $6 to $9 |
$8 to $12 |
You’ll also need:
Composite decking boards (12ft length)
Joists and beams
Fascia boards
Trim pieces
Railings (if you want them)
Lighting (optional)
Choosing quality materials makes your deck safer and more attractive. You can enjoy your new space for years with the right supplies.
Before you start building, you need to plan your design and make sure you follow local rules. Good planning helps you avoid problems later. You want your deck to look great and stay safe for years.
Getting your measurements right is key. You want your deck to fit your space and stay square. Here’s how you can measure and mark your area:
Place ground control points at the corners and center of your deck area. Five points work best for accuracy.
Make sure you don’t move these points once you set them. Plan their spots so they don’t get in the way.
Use a tape measure and a framing square to check your lines. Try the 3-4-5 method: measure 3 feet on one side, 4 feet on the next, and the diagonal should be 5 feet. If it matches, your corner is square.
Use strings and batter boards to outline your deck. This helps you see the shape and size before you build.
Double-check your measurements. Measure diagonally from corner to corner. If both numbers match, your frame is square.
Tip: Sketch your deck on paper first. Draw the shape and write down your measurements. This helps you spot mistakes before you start building.
You need to follow local building codes to keep your deck safe and legal. Most towns have rules for decks. Here’s what you should check:
Find out what materials are allowed. Some places have rules about composite decking.
Make sure your deck can hold at least 50 pounds per square foot.
If your deck is higher than 30 inches, you need railings. Railings should be between 34 and 38 inches tall.
Stairs need to be at least 36 inches wide. The steps should be even, with no more than ⅜ inch difference between them.
You usually need to submit two copies of your deck plan. Include drawings of the frame, footings, beams, and stairs.
The zoning department will check your plan for setbacks and easements.
If you need a variance, apply early. It can take time to get approved.
Note: Always check with your local building authority before you start. Rules can change from place to place.
Taking time to plan your deck layout and check codes saves you trouble later. You’ll build a deck that looks good and meets all safety rules.
A strong, level frame is the secret to a deck that lasts. You want your composite boards to sit flat and stay secure for years. Let’s break down the steps so you can build a frame that supports your deck and keeps it safe.
You have a few choices when it comes to deck foundations. Each type works best for different soil and deck sizes. Here’s a quick look at the most common options:
Foundation Type | Overview | Pros | Cons | Best For |
|---|---|---|---|---|
Poured Concrete Footings | Dig and fill with concrete | Very strong, stable | Hard work, weather limits | Large, permanent decks |
Precast Cement Blocks | Set blocks on ground | Easy, cheap, adjustable | Less support, may shift | Small, ground-level decks |
Precast Stackable Cement Footings | Stack modular blocks | Strong, less digging | Heavy, costs more | Medium decks, tough soil |
Buried Post Footings | Bury wood posts in ground | Simple, natural look | Needs upkeep, can rot | Low decks, dry areas |
Screw Piles | Screw steel shafts into ground | Super stable, fast install | Pricey, needs pros | Deep, tricky soil |
Tip: Pick a foundation that matches your soil and deck size. If you’re not sure, ask your local building department for advice.
Once your foundation is set, you can start framing. You want everything level and spaced right so your boards don’t sag or shift. Here’s how you do it:
Set and level your deck footings. Use a level to check each one before you move on.
Secure the ledger board to your house with lag screws or bolts. This keeps your deck attached and safe.
Install beams and posts. Use anchors and connectors for extra strength.
Lay out and install joists. Use joist hangers and follow spacing rules.
For 12ft composite decking boards, you should space joists 16 inches apart if you lay boards straight. If you want a diagonal pattern, use 12-inch spacing. Tighter spacing helps stop sagging and keeps your deck solid.
16" on center for straight boards
12" on center for diagonal boards
Note: Always check the manufacturer’s guide for joist spacing. Composite boards need more support than wood.
Building a solid frame takes time, but it’s worth it. You’ll end up with a deck that feels sturdy and looks great.
Are you ready to build your deck? This easy guide will help you install 12ft composite decking boards. You will learn how to lay out boards, make gaps, use hidden fasteners, and add a picture frame for a nice finish. Let’s begin your outdoor project!
You want your deck to look straight and feel strong. Start by putting your 12ft composite decking board on the frame. Begin at one edge and move across. Place the first board so it lines up with the edge. Make sure it is square with the frame. Use a chalk line to keep things straight. Check that joists are spaced right—experts say 300mm to 400mm apart is best.
Here is how to lay out your boards:
Put the first board along the edge.
Use spacers to keep the board straight.
Check with a framing square.
Lay the next board with the same space.
Keep going until you reach the end.
Tip: Take your time with each step. If you rush, boards can be uneven and the deck may look wavy.
Some mistakes are bad joist placement and rushing the setup. Always check your measurements. Make sure boards go across the joists. This helps your deck stay strong and look good for a long time.
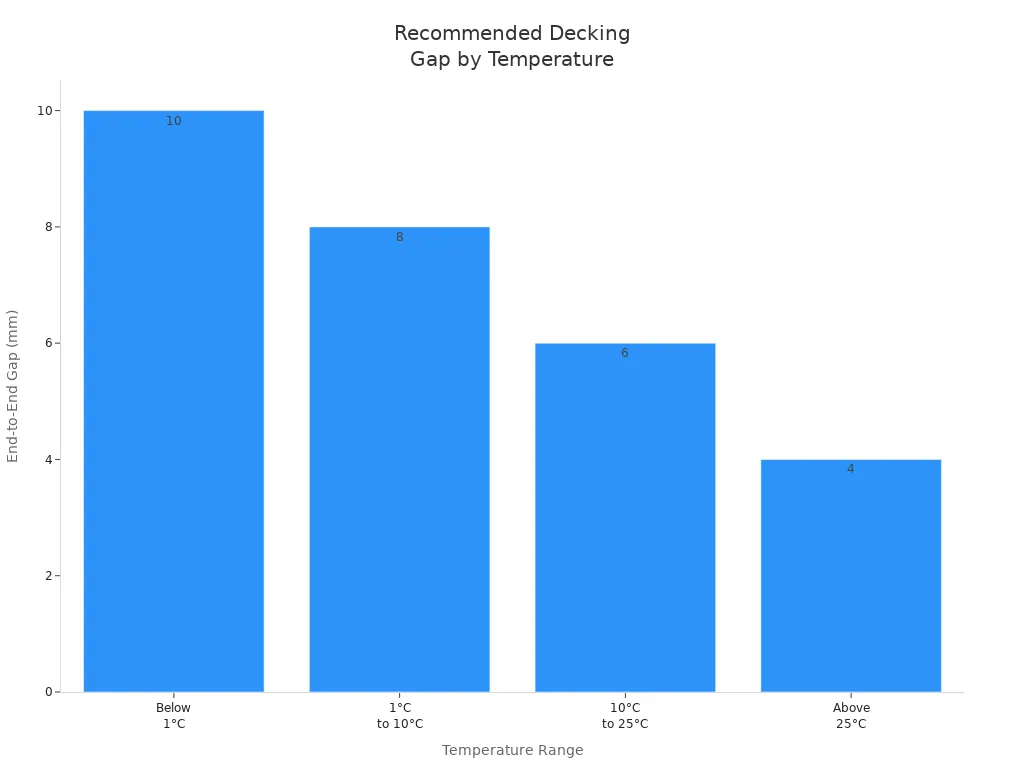
Composite decking changes size with heat and cold. You need to leave gaps between boards so they do not buckle or crack. The gap size depends on the temperature when you install. Use the table below to see the right spacing for your composite decking:
Temperature Range | End-to-End Gap | Width-to-Width Gap |
|---|---|---|
Below 1°C | 10mm | 3/8" |
Between 1°C and 10°C | 8mm | 1/4" |
Between 10°C and 25°C | 6mm | 1/4" |
Above 25°C | 4mm | 1/4" |
Leave a 1/4 inch gap if it is warmer than 40°F. On cold days, use a 3/8 inch gap. If boards touch a wall, leave a 1/2 inch space. This way, your deck can move with the weather and stay safe.
Note: Not leaving space for movement is a common mistake. Always plan for expansion so your deck does not break later.
You want your deck to look smooth and neat. Hidden fasteners work best to hold boards down. They keep the top flat and hide screws. Here is how to use hidden fasteners for composite decking:
Use special fasteners for each board.
Put hidden clips between boards.
Attach clips to joists with a drill.
For the edges, use screws that match the board color.
Use hidden clips and plugs for stairs and edges.
Try butt joint clips if you join boards.
Tip: Using the wrong fasteners can cause boards to move or crack. Always follow the instructions from the manufacturer.
Bad drainage and wrong fasteners are common mistakes. Make sure your deck slopes a little so water runs off. Only use fasteners made for composite decking to keep boards tight and your deck looking good.
Do you want your deck to look special? Try the picture framing method. This adds a border around your deck and hides cut ends. Use a different color or style for the frame.
Here is why picture framing is a good idea:
Benefit Type | Description |
|---|---|
Aesthetic | Hides cut ends and gives a clean look. |
Structural | Protects edges from damage and adds strength. |
Design Potential | Lets you make cool patterns and split up deck areas visually. |
Clean look: Covers cut ends and makes a nice finish.
Edge protection: Keeps ends safe from weather and damage.
Better flow: Shows different parts of your deck.
Tip: Picture framing looks great and helps your deck last longer by protecting the edges.
When you use picture framing, your deck looks better and stays strong. Many people like this method because it gives a pro result.
Always watch brand videos or read manuals before you start. Each brand has its own rules.
Double-check joist spacing and fastener type.
Look at your work as you go. Fix mistakes early.
Take breaks and review your steps to stay focused.
Good planning and careful work help you build a great deck. If you install composite deck boards the right way, your deck will look awesome and last for years. Enjoy your new deck and show it off to friends and family!
You want your deck to look polished and last for years. Fascia and trim give your deck a finished edge and protect the frame from weather. When you install fascia, you need to keep moisture out and let air flow. Here are some smart ways to do that:
Leave a gap at the bottom of the skirt or use vented skirting. This helps air move and keeps moisture from getting trapped.
Keep at least a 1-inch space between the skirt and the ground. This stops frost from pushing up your boards.
Use spacers between fascia boards and joists. This creates a gap for water to drain and air to flow.
Always follow the manufacturer’s rules for spacing and gapping. Composite boards expand and contract with temperature changes.
Pick manufacturer-approved fasteners and spacers. These let the fascia move a little and prevent cracks.
Pre-drill holes and keep a safe distance from the edge. This keeps the boards from splitting.
Make sure deck boards hang over the joists. This stops water from pooling between the fascia and the frame.
Tip: Plan for easy access to hidden spots. You might need to check under the deck for cleaning or repairs.
Railings and lighting make your deck safe and stylish. You can choose from many options that work well with composite decking. Want to see what’s available? Check out this table:
Lighting Type | Works with Composite Decking | Colors and Features |
|---|---|---|
Under-Rail Light | Yes | Architectural Bronze |
Accent Light | Yes | Gloss White, Matte White, Bronze |
Post Cap Light | Yes | Matte White, Matte Black, Espresso |
Solar Post Cap Light | Yes | Solar-powered, no wiring needed |
Stair Riser Light | Yes | Durable for foot traffic |
Recessed Deck Light | Yes | Flush with deck boards |
Indirect Light Post Cap | Yes | Black, White, Dark Bronze |
You can mix and match railings and lights to fit your style. Many people like natural wood tones or bold colors for a modern look. Some choose monochrome for a sleek finish. Recycled materials and low-maintenance options are also trending.
Note: Try adding accent lights or post cap lights for a cozy feel at night. Solar options make installation even easier.
With the right finishing touches, your deck will stand out and stay beautiful for years.
You just finished your deck. Now, you want it to look fresh and stay clean. Start with a good first cleaning. Here’s a simple way to do it:
Clear the deck. Move furniture, planters, and anything else off the boards.
Remove debris. Sweep away leaves and dirt with a broom or use a leaf blower.
Prepare your cleaner. You can use a store-bought product like Wash Safe Spray & Clean Composite Deck Cleaner. It works well on all brands and removes stains like moss and mold. If you want a homemade option, mix one cup of white vinegar, one gallon of warm water, and a quarter cup of baking soda. This gentle mix cleans grime without hurting your deck.
Section off the deck. Clean small areas at a time so the cleaner doesn’t dry out.
Scrub and rinse. Use a soft brush to scrub the boards, then rinse with clean water.
Dry the deck. Wipe with towels or use a leaf blower to speed up drying.
Tip: Always check the label on your cleaner. Some products can harm plants or pets if you use too much.
Keeping your deck in top shape is easy if you follow a few simple steps. Regular care helps your deck last longer and look great.
Sweep often to keep dirt and leaves away.
Unclog gaps between boards so water drains well.
Clean up spills right away to stop stains.
Use a soft brush and warm soapy water for dirt or salt.
Avoid standing water. Mold and mildew love wet spots.
Redirect rainspouts so water doesn’t pool on your deck.
Make sure air can flow under the deck to help it dry.
Pick woven rugs instead of rubber-backed mats. Rubber traps moisture.
Skip organic mulch near the deck. It can cause damage.
Do a deep clean once a year with a composite deck cleaner.
Use mold and mildew removers if you see any growth.
Note: Composite decking usually lasts 25 to 30 years. That’s about three times longer than wood. With good care, you’ll enjoy your deck for decades.
You made it through the key steps for installing 12ft composite decking boards. Careful planning and a step-by-step approach help you avoid mistakes and choose the best materials. When you clean your deck often and fix small problems early, your deck stays strong and looks great for years. Composite decking is low-maintenance and eco-friendly, so you get more time to relax. Enjoy your new outdoor space and show off your hard work to friends and family!
You can use a circular saw with a fine-tooth blade. Always measure twice before you cut. Wear safety glasses. Cut slowly for a smooth edge. Clean up dust after you finish.
Yes, you can if the frame is strong and level. Check for rot or damage first. Replace any weak joists. Make sure the spacing matches the composite board requirements.
No, you do not need to seal or paint composite decking. The boards come with color and protection built in. You just clean them to keep them looking good.
Sweep your deck often. Use warm soapy water and a soft brush for stains. Rinse with clean water. Avoid harsh chemicals. You can use a composite deck cleaner for tough spots.
You should use screws made for composite decking. Regular screws can crack the boards or rust. Composite screws hold tight and match the color for a neat look.