Views: 0 Author: Site Editor Publish Time: 2026-01-12 Origin: Site
Brand | Key Features |
|---|---|
Trex | Made from 95% recycled materials. Does not fade, scratch, or stain easily. Needs little care. |
Fiberon | Strong core does not splinter or rot. Easy to clean. Has long warranties. |
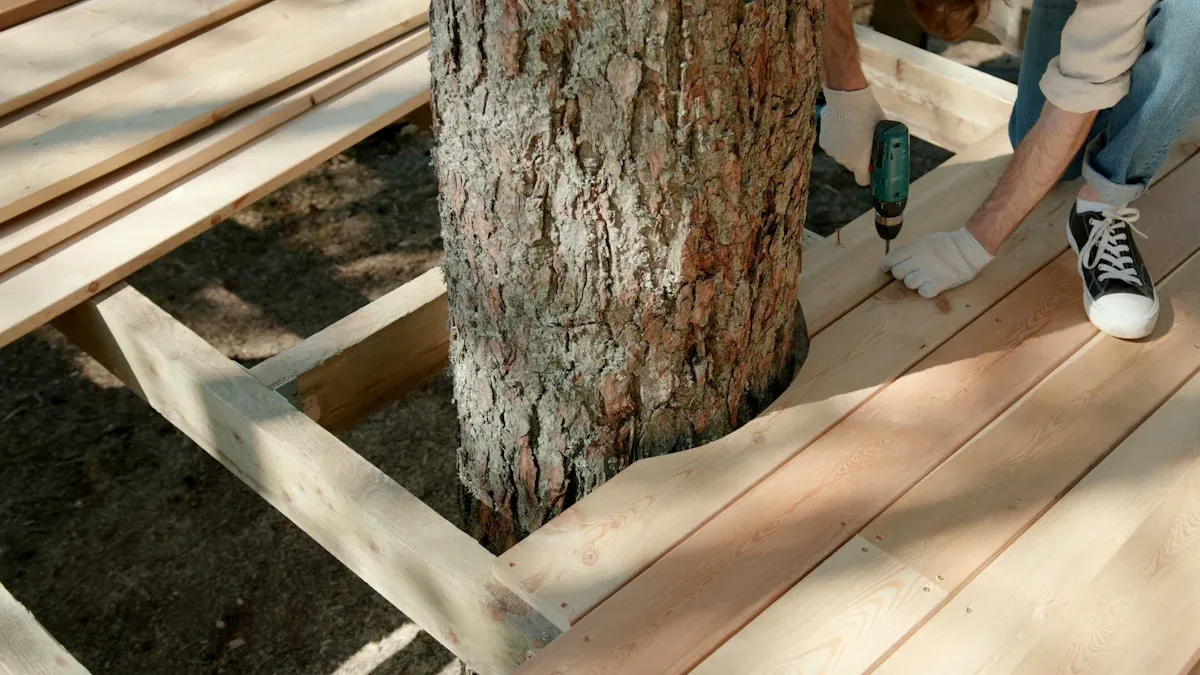
If you are new to DIY, do not worry. Many people like you think composite decking is easy to put in. It helps to use 12" on center joists for more strength. Always check the manufacturer’s rules.
Pick good composite decking brands like Trex or Fiberon. These brands last a long time and need little care. - Get the tools you need like a tape measure, circular saw, and drill. These tools help you install the boards easily. - Measure and mark carefully for a deck that looks nice. Always check your measurements two times. - Leave enough space between boards so they can expand. This stops the boards from bending or breaking. - Clean your composite deck often with soap and water. This keeps it looking nice and helps it last longer.
You want your deck project to go smoothly. Start by gathering the right tools. You need a tape measure for accurate cuts. A circular saw helps you trim boards to fit. Use a drill with bits for pre-drilling holes and driving screws. A rubber mallet comes in handy for tapping boards into place. Spacers keep gaps even between boards. Safety goggles and gloves protect your eyes and hands. You might also want a speed square for marking straight lines. These tools make the job easier and safer.
Tip: Double-check your tool kit before you start. Missing tools slow you down.
Choosing the right Composite Decking boards matters. Popular brands like Trex and UltraDeck offer strong, fade-resistant boards. You can find these at stores like Lowe’s or Home Depot. Look for boards labeled “12ft” and check for features like slip resistance and realistic wood grain. Boards should match your deck’s color and style.
Here’s a quick look at price ranges for 12ft boards:
Brand | Price Range (per linear foot) |
|---|---|
Trex | $3–7 |
UltraDeck | $3–10 |
You also need fasteners, hidden clips, and joist tape. These keep your deck secure and help prevent moisture damage. Composite Decking boards cost about $25–$40 per square foot installed. They last 25–50 years and need only occasional cleaning. You get a consistent timber look with realistic grain.
Material | Cost per sq. ft (installed) | Durability | Maintenance Level | Appearance |
|---|---|---|---|---|
Composite | $25 – $40 | Very High (25–50 years) | Very Low (occasional cleaning) | Consistent timber look with realistic grain |
You can buy everything at big box stores or online. Always check the specs for thickness, width, and warranty. Picking quality materials means your deck will look great and last for years.
You want your deck to look sharp and last for years. Start with careful measuring and marking. Grab your tape measure and mark out the exact area for your deck. Double-check your measurements. If you get this step right, you will have fewer joints and a cleaner look. Use a chalk line or a speed square to mark straight edges. This helps you keep everything lined up.
Tip: Sketch your deck plan on paper before you start marking. It helps you spot mistakes early.
Here’s a simple checklist to guide you:
Measure the length and width of your deck space.
Mark the corners with stakes or spray paint.
Use a chalk line to connect the marks for straight edges.
Check for square corners using a speed square.
Mark joist positions for even spacing.
Accurate measuring and marking set the stage for a professional finish. You will save time and avoid headaches later.
A clean and level surface is key for a sturdy deck. Before you lay any boards, clear the area of grass, rocks, and debris. You want a solid base. Lay down gravel for stability or install concrete footings if your deck will be raised. Build your frame with pressure-treated wood. Secure it with joist hangers or metal brackets for strength.
Now, focus on cleaning. Use a soft broom or leaf blower to remove loose dirt. Wet the area to soften stains. Choose a gentle cleaning agent or mix vinegar with water for light cleaning. Scrub along the grain with a soft brush, especially where you see stains. Rinse the area in a zigzag pattern to wash away all cleaning agents. Let the surface air dry and check for any leftover stains or damage.
Note: Gather all your tools and materials before you start. This keeps your project moving and helps you avoid delays.
A level surface means your Composite Decking will sit flat and look great. Take your time with these steps. You will thank yourself later when your deck feels solid underfoot.
You want your deck to look great and last for years. The way you lay your boards makes a big difference. Start by thinking about how people will walk across your deck. Place boards so they run perpendicular to the main traffic flow. This helps with strength and gives your deck a smooth look.
Here are some tips for planning your board orientation:
Use correct joist spacing. This prevents sagging and keeps your deck safe.
Check your local building codes. These rules help you avoid fines and keep your deck strong.
Closer joist spacing gives your deck a solid feel underfoot.
Try to line up your boards with the longest edge of your deck. This reduces the number of joints and makes your deck look neat.
If you use reversible boards, you get even more options. These boards have different textures or finishes on each side. You can flip them to match your style or change the look over time.
Feature | Description |
|---|---|
Dual-sided Nature | Offers different textures and finishes on each side. |
Aesthetic Options | Lets you customize your deck’s appearance. |
Installation Ease | Makes the process simpler for you. |
Good planning helps your deck last longer and look better. You can try these layout strategies:
Add built-in seating to save space and create cozy spots.
Use multi-functional furniture for flexibility.
Pick railings that match your style and add safety.
Plan for easy movement by creating clear zones.
Use planters and lighting to decorate without taking up floor space.
Choose boards with wood-grain textures for a natural look.
Always keep the right gap between boards. This stops water from pooling and keeps your Composite Decking in top shape. If you follow these steps, you will have a deck that feels sturdy and looks amazing.
You want your deck to feel solid every time you step on it. Start with strong framing. Use pressure-treated lumber for the frame. Make sure your joists are spaced correctly—usually 12 inches on center for 12ft boards. This spacing gives your Composite Decking the support it needs and helps prevent sagging.
Add blocking at corners and transitions. Blocking supports picture frame boards and keeps everything tight. Secure the picture frame boards with hidden fasteners or color-matched screws. Always measure twice before you cut. If you make accurate mitered cuts, your deck will look sharp and professional.
Tip: Double-check your joist spacing before you move on. Incorrect spacing can cause boards to bow or feel bouncy.
Common mistakes include using the wrong fasteners or forgetting to protect your frame from moisture. Use joist tape and waterproofing products to keep your frame dry. Stainless steel or galvanized fasteners work best because they resist rust.
Getting the first board right sets the tone for your whole deck. Start at the edge of your frame. Snap a chalk line 1.5 inches from the wall to guide your starter clips. Pre-drill and attach a starter clip at each joist along the line. Push the first board into place and secure it with the clips.
Here’s a simple step-by-step process:
Lay your first board flush with the frame.
Pre-drill holes 2 inches from the end and 1 inch from the outer edges.
Drill screws straight down into the board.
Slide the next board into place, keeping it parallel to the first.
Use spacers to keep a 1/4 inch gap between boards.
Trim the final board to fit if needed.
If you follow these steps, you’ll get a clean, straight start. Composite Decking boards are easy to install and don’t need staining or sealing. You can focus on getting the layout right without worrying about future upkeep.
You want your deck boards to stay flat and look neat for years. Leave space between boards to allow for expansion and contraction. Most experts recommend a gap between 1/8 and 1/4 inch. A 3/16 inch gap works well for most climates.
Use plastic spacers or a deck board jig to keep gaps even. These tools make the job easier and help guide your fastener placement. Regular cleaning with a brush and mild detergent keeps the gaps clear and prevents moisture buildup.
Note: If you skip the spacing, your boards might warp or crack as the weather changes.
Check your manufacturer’s instructions for spacing and fastener placement. Proper spacing helps your Composite Decking resist warping and keeps it looking fresh.
Challenge | How to Fix It |
|---|---|
Warping | Leave proper gaps between boards. |
Moisture buildup | Clean gaps and ensure good ventilation. |
Bowing boards | Use correct joist spacing for support. |
You want your deck to look polished, not rough. Finishing the edges makes a big difference. Try using composite bullnose edging for steps. Bullnose boards have rounded edges that look smooth and reduce trip hazards.
Attach corner trim to vertical corners for a neat finish. Trim boards cover unfinished ends and give your deck a professional look. Picture framing is another great option. Create a border around your deck using boards that match or contrast with your main decking. This hides rough edges and makes your deck stand out.
You can also use raised fascia boards to cover end-cuts and rim joists. Fascia gives your deck a crisp, clean appearance.
Tip: Take your time with edge details. A well-finished edge makes your deck look like it was built by a pro.
If you follow these finishing techniques, your deck will look sharp and stay safe. Composite Decking is fade-resistant, so your edges will keep their color and style for years.
You want your deck to look good year after year. The best part about composite decking is how easy it is to care for. You don’t need to stain, seal, or paint it. Just grab some soap and water, and give it a quick wash every so often. That’s all it takes to keep your deck clean and safe.
Here’s a quick look at how composite decking compares to wood:
Feature | Composite Decking | Traditional Wood Decking |
|---|---|---|
Resistance to Rot | Yes | No |
Insect Damage Resistance | Yes | No |
Fading Resistance | Yes | No |
Need for Staining | No | Yes |
Need for Sealing | No | Yes |
Cleaning Requirements | Soap and water occasionally | Regular cleaning, staining, and sealing |
Risk of Splintering | No | Yes |
You don’t have to worry about splinters or rot. Your deck stays smooth and safe for bare feet. Once a year, do a deep clean and check for any loose boards or fasteners. Use a soft brush and a gentle cleaner. If you see any dirt or leaves stuck between boards, sweep them out. That’s it—no sanding or sealing needed!
Tip: Clean up spills quickly to avoid stains. Rinse your deck after using a grill or having a party.
You want your deck to last, so watch out for these common mistakes during installation:
Not letting boards adjust to your local weather before installing. Boards can change size if you skip this step.
Using the wrong fasteners. Always use screws and clips made for composite boards.
Forgetting to leave gaps between boards. Tight boards can warp or crack when the temperature changes.
Spacing joists too far apart. Boards might sag or develop tiny cracks.
Fixing boards directly to the ground. Your deck needs room to breathe and move.
Gluing boards instead of using clips or screws. Glue stops boards from expanding and contracting.
Skipping a vapor barrier or drainage layer under your deck. Moisture can build up and cause problems.
Note: Always follow the manufacturer’s instructions for spacing, fasteners, and support. Double-check your work before moving to the next step.
If you avoid these mistakes, your deck will stay strong and look great for years.
You now know the main steps for laying 12ft composite decking boards. First, measure your space. Next, get everything ready. Then, make a plan. After that, install your boards. Last, take care of your deck. Composite decking is tough and easy to care for. Keep your deck clean and look for any damage. This helps your deck last a long time.
Benefit | Composite Decking |
|---|---|
Lifespan | Up to 50 years |
Maintenance | Simple cleaning only |
Eco-Friendly | Made from recycled materials |
If you use these tips, your deck will look nice and stay strong for many years.
You can expect your composite boards to last up to 50 years. Most brands offer long warranties. You get durability and a deck that stays strong for decades.
Yes, you can cut composite boards with a regular circular saw. Use a sharp blade for clean edges. Always wear safety goggles and gloves when you cut.
Composite decks can get warm on sunny days. Lighter colors stay cooler than dark ones. If you want a cooler deck, pick boards with a lighter shade.
You only need soap and water for most cleaning jobs. Avoid harsh chemicals. Use a soft brush for tough spots. Quick cleaning keeps your deck looking fresh.